Excel has gridlines in each sheet or your workbook. These are the light gray lines that outline each cell in the sheet. Gridlines can help you distinguish between the rows, columns, and any data they contain. But maybe you don’t want to see the gridlines in your final report or dashboard. In this case, you will want to hide these gridlines. Removing the gridlines is very easy and it can be done in many ways. Download a copy of the example workbook used in this post and follow along to discover all the ways you can show or hide the gridlines in your Excel workbooks.
Add or Remove Gridlines from the View Tab
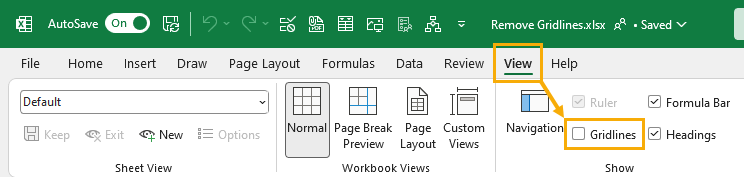
Removing the gridlines is such a common task that it has been included as a command in the Excel ribbon View tab. This is the most straightforward method for toggling on or off the gridlines. Follow these steps to toggle on or off the gridlines from the View tab. This will remove the Gridlines from the active sheet when you uncheck the Gridlines option.
Add or Remove Gridlines from the Excel Options Menu
The Excel Options menu is where you will find a ton of useful app and workbook settings to enhance your Excel experience, and you can also find the gridline settings here. Follow these steps to add or remove the gridlines from the Excel Options menu. This will open the Excel Options menu. This will remove the gridlines from your sheet!
Add or Remove Gridlines with a Keyboard Shortcut
There is no dedicated keyboard shortcut to add or remove the gridlines in Excel, but you can use the Alt hotkeys. When you press the Alt key, this will activate the hotkeys and the Excel ribbon will display what keys you need to press in order to navigate the ribbon commands. Press the Alt, W, V, G sequence on your keyboard to toggle on or off the gridlines with a keyboard shortcut.
Add or Remove Gridlines from the Quick Access Toolbar
One way to make removing the gridline very easy is to add this command to your Quick Access Toolbar. This way it is always accessible with one click. Follow these steps to add the gridline command to your quick access toolbar. Now the command will be available in your Quick Access Toolbar! 💡 Tip: The Alt hotkeys are an easy way to use the commands in your Quick Access Toolbar! In this example, the Gridlines command is the 4th item in the QAT so you can press Alt + 4 to access it.
Add or Remove Gridlines when Printing
If you want to print your Excel reports, the gridlines don’t appear in the printed results by default. However, you may want the gridlines to appear and it is possible to have them show in the printouts. Follow these steps to add or remove the gridlines to your Excel printouts. This will open the Page Setup menu. Now your printouts will show the gridlines!
Add or Remove Gridlines from All Sheets with VBA
The methods you have seen so far for removing gridlines have one major issue. If you want to remove gridlines from all the sheets in your workbook, you will have to change the gridline setting for each sheet individually. This can be a very tedious process when you have a lot of sheets in your workbook. You can use a VBA script to automate this process and remove the gridlines from all the sheets at once. Go to the Developer tab and click on the Visual Basic command to open the visual basic editor. If you don’t find this tab in your ribbon, you can easily add the Developer tab to your ribbon. You can also press Alt + F11 on your keyboard to open the editor. Go to the Insert menu and select the Module option to create a new module. This is where you can add the VBA code that will remove the gridlines in all the sheets of the workbook. Select the new module and then paste in the above code. This code will loop through all the sheets and toggle on or off the gridlines depending on the gridline status of the sheet in view when you run the macro. This is a quick way to toggle gridlines for all the sheets!
Add or Remove Gridlines from All Sheets with Office Scripts
There is another option for automating the removal of the gridlines from all your sheets. If you are using Excel online with a business plan, then you will have access to Office Scripts. This is a JavaScript language that can be run for Excel on the web! You can create an Office Script to toggle on or off the gridlines from your entire workbook. Go to the Automate tab in Excel online and select the New Script command. This will open the Office Script editor and you can copy and paste the above code into the editor. This code will loop through all the sheets in the workbook and toggle on or off the gridlines based on the gridline status of the current sheet. Press the Run button in the editor to run this code and easily switch between showing or hiding the gridlines while using Excel on the web.
Conclusions
By default, light gray lines separate each cell in your workbook, but you can remove these lines for a much cleaner look to your Excel reports and dashboards. The gridline settings can be found in either the View tab or the Excel Options menu and these will toggle on or off the gridlines on a per sheet basis. When printing your Excel reports, it is also possible to include the gridlines if needed. You can also use VBA or Office Scripts to automate the process of removing gridlines in all your sheets. This is essential when you have a workbook with many sheets. Do you like the default gridlines or do you prefer to remove than from your workbooks? Do you know any other ways to get this done? Let me know in the comments section below!